When it comes to insulating your home and achieving energy efficiency, choosing the right material is key. Batt insulation has long been a go-to for its ease of installation and effectiveness in interior walls and ceilings. It comes in various types, from fiberglass to mineral wool, and more recently, the game-changing wood fiber insulation. Importantly, motivated homeowners can DIY installing batt insulation with the right tools and steps. If you count yourself among these, we can guide you on how to select and source materials, how to cut batt insulation and properly install it in your space.
Types of Batt Insulation
While fiberglass batts have been the industry standard due to their low cost and wide availability, they come with downsides such as potential lung irritation and over-compression. To safely install fiberglass batt insulation, you must wear a dust mask and safety glasses, but even with these precautions, glass fibers can cling to clothing or drift into other parts of your home. Mineral wool is similar in its risks to your health but is also known for its fire resistance and soundproofing abilities. Mineral wool batt insulation is typically more expensive than fiberglass.
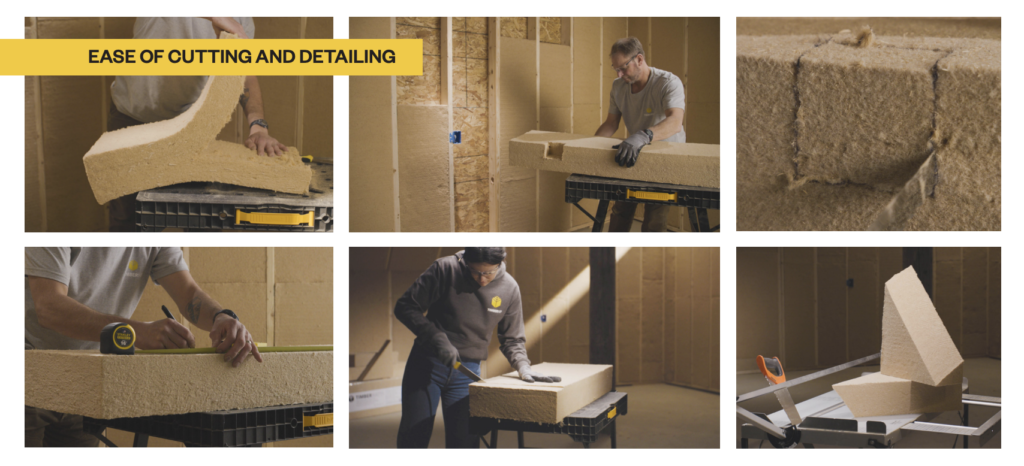
However, there’s a new player in town that is gaining popularity among DIYers for good reason – wood fiber batt insulation. Competitively priced between fiberglass and mineral wool and free from abrasive fibers, it’s a DIYer’s dream. For maximum comfort while installing. consider wearing a dust mask or safety glasses when performing overhead work. Cut-resistant gloves are always recommended when cutting batts, but long-sleeves are not needed due to the absence of irritating fibers in wood-fiber insulation. It’s flexible and semi rigid, making it easy to handle and install for homeowners. The high density, interlocking fibers can be torn vertically to install around wires in wall cavities and make for clean and precise cuts with a simple serrated knife. And like mineral wool, wood fiber is a superior acoustical batt insulation, absorbing sound to bring serenity to your home. Its natural composition doesn’t just insulate; it also regulates humidity, contributing to a healthier home environment.
Perhaps our favorite part: wood fiber batt insulation arrives at your home carbon negative and will continue to store carbon throughout the lifetime of the building. Made from the natural waste chips of the lumber and forestry industry, it is renewable, fully recyclable, and supportive of a more sustainable forest economy.
But enough said, you want to know how to install batt insulation in your home.
Preparing to Install Batt Insulation
While most insulating happens when your home is being built, there are plenty of common reno projects that offer a great opportunity to improve your home’s energy efficiency with upgraded batt insulation. Let’s imagine you’re turning your attic into a semi-finished space—nothing fancy, just some room for a reading nook or some arts and crafts space for your kids—and you want to ensure it stays warm in the winter and cool in the summer. Even if you don’t plan to spend a lot of time up there, your roof is a major pathways to heat loss, so investing in insulation there can make a big difference in your heating bill.
Before you begin your insulation project, you’ll need to source your materials. Check out TimberHP’s distributor list to find a local supply store that stocks wood fiber batt insulation.
How Much Batt Insulation Will I Need?
Get out the measuring tape! To avoid overspending on excess insulation or underbuying and needing to order more halfway through the project, it’s important to take accurate measurements of your space before you order your insulation. Start by measuring the depth of your framing – whether they’re wall studs, ceiling joists, or rafters, to gauge the thickness of batt insulation you’ll need. Then measure the width between each framing member. TimberBatt ranges in thickness from 3” to 7.25”, and is available in widths sized for 16″ or 24″ o.c. wood framing. Count the number of cavity bays you will need to fill and measure the length of the space that needs insulating. Use these measurements to determine the total square footage you will need to cover and remember that batt insulation can always be cut or trimmed to fit your unique space.
Tools for Installing Batt Insulation
In addition to the batt insulation, you’ll need a few simple tools to get the job done. In fact, you may already have many of these items in your house:
- Tape Measure
- Straight edge or T-square
- A soft-fiber saw or knife
Having the right knife makes all the difference! Our favorite tools are the Bahco Insulation Saw, our Custom TimberBatt Knife, or the Linzen Insulation Knife. Other insulation knives with large scalloped blades may also work well, but you may find cutting to be difficult with the red-handled mineral wool batt knife. Check out this Cutting Demonstration on Instagram to see our recommended knives in action!
You may also want a putty knife to help ensure the edges of the batt insulation are flush with the studs.
Preparing Your Space
The last step before you begin installing batt insulation is to prep your space, in this case an attic. Clear the area of any personal items, debris, and old insulation. Keep your eye out for stray nails or screws and inspect the joists for any pointy protrusions so that you can be aware of them when installing. Once everything is clean, you’re ready to go.
How to Install Batt Insulation
Position the wood fiber batt insulation between the studs and push to fill the cavity. Unlike with fiberglass, pressing wood fiber batt will not compress it and reduce its insulating effectiveness so don’t be afraid to push it in for a good fit. If you’ve chosen the correct width, the batt insulation should form a friction fit between joists.
While less likely to encounter in an unfinished attic, there may be electrical wiring or pipes you need to work around. If the wiring runs perpendicular to the batts, you can use your hands to gently tear the batt vertically and fit it around either side of the wires, or you can cut the batt down the middle with your insulation knife or saw.
For pipes, you’ll need to measure their diameter so that you can make appropriate cuts in the batt to accommodate them. Lay your batt on a flat surface and mark the area you’d like to cut with a permanent marker. Use your insulation knife to cut a cavity in the batt. For vertical pipes, you may need to split the batt in half and fit each piece on either side.
Ensure that your batt insulation does not come in direct contact with any non-insulated recessed lighting or chimneys to avoid potential fire hazards. Use scraps to fill in any remaining gaps or cracks. If there are any areas are over-compressed, you can use a putty knife to pull the edges of the batt out so they are flush with the joists.
Optional: Finishing the Wall
If your goal is just to add energy efficiency to your home and keep the temperature of your attic regulated, you can stop here. If not, the next step might be to install your choice of wall covering, either drywall, beadboard paneling, or some simple canvas sheeting to make the space look clean. There are many great resources for DIY drywall installation on the internet that can help you complete your attic transformation. From there, the attic is your oyster! Paint, add décor, furniture and more.
Bonus: Additional Attic Insulation
If you don’t plan to actively use your attic for storage or living space, you can take your insulation a step further with additional batt insulation or loose fill. If your attic doesn’t have an existing subfloor, batt insulation can also be used to fill joists here. You can also opt for a blown-in solution to appropriately cover the attic space and provide extra thermal barrier to your home. Check out our cost benefit analysis of insulating an unfinished attic for more information on how these steps can benefit your home energy efficiency.
When taking this route, it’s important to properly vent behind the insulation to avoid moisture issues. You will need a class 2 vapor retarder such as unfaced expanded or extruded polystyrene, asphalt coated paper, plywood, or Bitumen-coated kraft paper which reduces the rate at which water vapor can move through your insulation. The best way to ensure maximum energy efficiency in your home is to consider proper insulation from the ground up, but the DIY-friendliness of wood fiber batt insulation makes it ideal for many home projects like bathroom remodels, finishing basements, and other major home renovations and additions. Feel free to reach out to our team of experts whether you’re looking to do-it-yourself or find an installer to bring sustainable, wood fiber insulation into your home design.