The Importance of Your Home’s Thermal Envelope

When my partner and I bought our 1960’s home, we knew it was sorely lacking in some key energy efficiency components. Many of the windows, for example, were original to the house and drafts around their edges were immediately apparent. But our house was losing efficiency in other, less obvious ways revealed by our home inspector’s infrared camera. Who knew the recessed toilet paper holder was a source of heat loss?! There were plenty of invisible flaws working against our (admittedly 40-year-old) HVAC system.

While a new heating system and energy-efficient appliances can do a lot, we weren’t going to improve energy efficiency in a significant way until we addressed the big picture: our thermal envelope.

What is a Building Envelope?

Just like the packaging for your mail, a building envelope is the physical barrier between your home’s interior and exterior. It’s a combination of the foundation, walls & siding, roof, and fenestrations (windows & doors). As you can imagine, it protects the interior of the home from wind, rain, snow, dirt, and sunlight. Its protection goes both ways, keeping elements from getting in and preventing heat or AC from getting out. The strength of your building envelope therefore controls temperature, moisture, air pressure, light, and even noise inside your home.

The better your thermal envelope, the less work your system will need to put in to maintain a comfortable temperature—meaning less energy used.

Much of the efforts in the construction industry to improve energy efficiency in both residential and commercial applications focus on enhancing thermal envelopes. For example, every 3 years the International Code Council releases a new set of guidelines, the IECC for energy conservation in building design and construction with standards for insulation, walls, floors, doors, and more.

Passive house design, widely considered the highest standard for home energy efficiency, also focus on perfecting the building envelope to achieve up to 90% less energy use than an average home.

How to Improve Energy Efficiency with a Superb Building Envelope

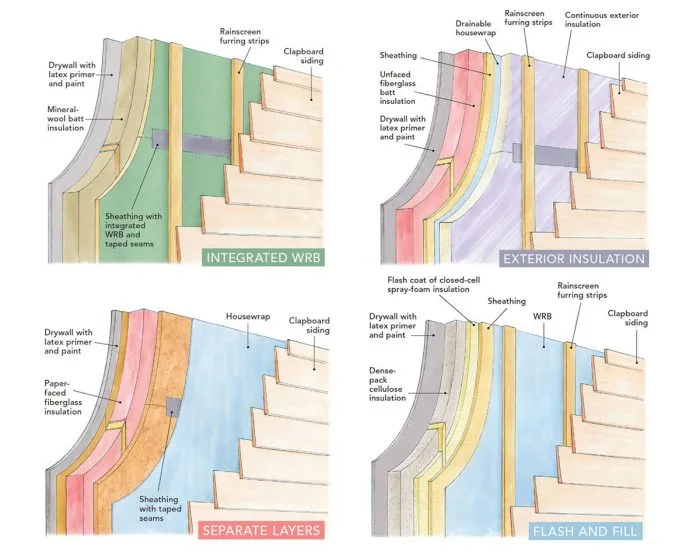
So, what makes a thermal envelope good? The best envelopes minimize thermal bridging, which occurs when heat passes through conductive materials to enter or escape your home. Studs, joists, metal components, and gaps in the insulation are common causes of thermal bridging. Here’s a breakdown of how to make each component of your building envelope maximally efficient.

Foundation

Your home’s foundation is the literal bedrock for the entire structure and benefits from the earth’s natural insulating properties. Just as it protects tree roots from extreme cold or heat, soil around your foundation can provide a buffer that moderates temperature fluctuations in your home. Typically made from rock or concrete, your foundation also has high thermal mass, helping to stabilize temperatures throughout the day. It’s no wonder my brother and I used to hang out in our family’s basement at the height of each summer.

However, these benefits alone do not always meet modern standards for energy efficiency. Cracks in your foundation, gaps around windows, doors, or the sill where the foundation meets the frame, and rim/band joists can compromise airtightness, allowing heat to escape or cold air (and often moisture) to seep in. Properly sealing and waterproofing your foundation is key to preventing energy loss.

Insulating your foundation also enhances efficiency and reduces the potential for thermal bridging. On new construction, exterior foundation insulation is becoming more common, applied to the outside of the foundation walls before backfilling. Continuous, rigid insulation board, like wood fiber TimberBoard, is most effective for these applications. It’s recommended to add a protective board/panel, 4” of pea gravel, and effective drainage away from the foundation to protect insulation from pests and moisture that could reduce its lifespan.

For existing homes, you can still improve your foundation’s contribution to the thermal envelope by insulating the interior. Rigid insulation board can be applied directly to interior walls, or you can frame walls and add high performance batt insulation like TimberBatt in between studs for a finished basement space.

Walls & Siding

Walls make up the bulk of the barrier between interior and exterior, so ensuring they are properly insulated and airtight is essential. Like an onion, walls are constructed with multiple layers that carefully manage water, air, vapor, and temperature:

  1. Siding: The outermost layer of your home’s walls takes the biggest hit from elements like precipitation, wind, and UV, so durability is key. Cedar shingles have been a popular choice since the 17th century, designed in an overlapping pattern to divert water away from the home and with natural rot and pest resistance.
  2. Continuous Exterior Insulation: Tongue and groove options like TimberBoard create a seamless, wind-tight, and water-resistant assembly. With the added benefit of vapor-open technology, this exterior wall insulation also allows excess moisture to escape, preventing rot and mold.
  3. Housewrap: Vapor-open housewrap provides another layer of moisture management to your building envelope. To be effective, housewrap must be properly integrated with flashing around all fenestrations… more on that later.
  4. Sheathing: Typically made with plywood, OSB, or Fiberboard, this layer primarily controls airflow and provides the structure on which other elements of the envelope rest. All seams in your sheathing should be taped to prevent air gaps.
  5. Insulated Studs: Now we’ve reached your home’s frame, where high-performance dense-pack or batt insulation should be installed consistently between studs. Any gaps or settling can create air pockets that reduce your energy efficiency. Wood fiber options like TimberFill and TimberBatt offer high R-value with natural, moisture-managing properties, superior sound dampening, and fire resistance.
  6. Painted Drywall: Finished walls play a role in your building envelope too. By applying latex primer and paint, drywall provides a vapor retarder.

There are many different common wall assemblies that use some or all of these elements as illustrated below by Fine Homebuilding. Some products combine multiple layers into one system for easier installation. But no matter the products specified, a quality envelope must manage water, air, vapor, and temperature.

4 types of common wall assemblies

Roofing

Roofs are one of the most common areas of heat loss in a home as heat rises and escapes through thermal bridges. Likewise, in hot weather, the sun can quickly heat your roof and therefore the air in your attic, making the interior of your house uncomfortable and putting your AC through the ringer.

Like wall assemblies, energy efficient roofs use multiple layers to mitigate thermal bridging. It all starts with decking installed on roof joists to provide a base for roof coverings. Then a roof underlayment is applied to the exterior of the decking to provide a waterproof layer if the roofing material fails. The outermost layer can be made from several materials like traditional asphalt, cedar, or slate shingles, metal roofing, ceramic tiles, or synthetic products. Any intersections between slopes or projections like chimneys, vent pipes, or adjoining walls require flashing.

Your roofing should not be left alone in its responsibility to protect your home from moisture. Properly installed and maintained gutters and downspouts are essential to direct water away from your home and foundation. Overhanging branches can also create persistent wet spots where the sun can’t reach so regular trimming is important.

Inside your attic or crawl space, high-performance insulation is imperative. In an unfinished space, loose TimberFill insulation can be installed on the attic floor at the proper depth for your climate, preventing heat from escaping and keeping your living spaces below cool. TimberBatt insulation can also be laid between floor joists if you plan to add flooring and use your attic for storage or additional living space.

Windows & Doors

The keyword here is airtightness. Fenestrations are openings in your building, including windows, doors, and skylights. Of course, you need these things to enter and exit your home, provide light and aesthetic appeal, and regulate airflow. But they do create vulnerabilities in your thermal envelope. Heat gain and loss through windows accounts for up to 30% of energy use for residential heating and cooling. First and foremost, it’s crucial to select high-efficiency windows and doors. Look for the Energy Star label when shopping, and select a rating that matches your climate. The National Fenestration Rating Council offers a handy tool for determining the energy ratings you need based on your location.

elements of an energy efficient window

Sealing around these fenestrations is equally important. Flashing should be installed around your window or door frame, and the sill should slope down towards the exterior to help unwanted water find its way out. Use an exterior rated sealant before fitting the window into place. Use caulk to fill any gaps between the window frame and the interior wall.

Ventilation

Preventing air from escaping or entering your home has been a big theme of this blog, but airflow also plays a part in your building envelope and indoor air quality. Mechanical ventilation systems like HRVs and ERVs can help efficiently exchange stale indoor air for fresh outdoor air with minimal heat loss or gain. Attic ventilation, for example, can release hot air during the summer and prevent moisture buildup. Ductwork, intakes, and outtakes should all be sealed to prevent air leakage. Properly venting appliances like your range and dryer, and installing fans in bathrooms to manage moisture also improves air quality. Regular maintenance and cleaning preserve the system’s integrity.

Wrapping Up Your Building Envelope

When all these components work together to create an efficient building envelope, your home can save up to 20% on heating and cooling costs and increase in value.

It’s our first winter as homeowners in Maine and my partner and I are doing what we can to improve our thermal envelope. We’ve added plastic sheeting to our old windows to reduce drafts, installed weather stripping around our door frames, cleaned the gutters, and trimmed our trees to get more sun on the roof. But come spring, we’ll be tackling some bigger projects. We aim to strip the old, water-damaged siding, install exterior insulation board, re-wrap the house, and put up fresh wood shingles. It’s a long list, but I’m looking forward to the differences it will make in our indoor comfort (and in our monthly bills). Wish me luck!